Posted on Leave a comment

Best method feeder pellets

best method pellets header

Method feeder fishing with pellets is becoming more and more popular, especially with day session carp anglers like myself.

There’s a wide range of weird and wonderful feeders out there as well as more pellets than you’d ever need. I’ve fished with a good few of them to bring you my top 3 pellets, how to prepare them and how to use the feeder to its full potential. If you’re completely new to feeder fishing you can find my guide to method feeder fishing here.

Top 3 feeder pellets

These are my top rated pellets for fishing the banjo style feeder and using a mould – The best way to fish them.

Number 1 – Sonubaits fin perfect

Kicking it straight off with my number 1 pellet – The Sonubaits Andy Finlay method feeder pellet – 4mm. I’m being very specific about this as these are the exact ones I always carry. This range comes in 2mm & 6mm and there is also a feed pellet in the same size and packaging so make sure you get the right ones. (You can the exact ones here).

Fin perfect method pellets

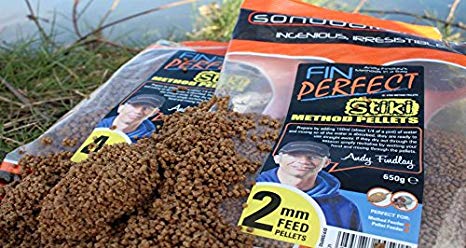
I prefer the 4mm as it just seems to work in the feeder better for carp and stay compact a little longer.

I fish these usually on a Preston innovations round banjo or a Dura banjo. These are the easiest pellets to mix on the market, all you need is a bucket!

How to prepare fin perfect method pellets

  1. Pour the bag into a bucket
  2. Add 150ml of water and mix well
  3. Get them in the feeder and cast out – easy as that.

If you want to mix it up, as we all do sometimes, add some flavouring to the water. I’ve used Beta Stim in the past or you can use a bait spray. You can also cover it in the latest goo style baits for an extra kick.

What hook bait should you use?

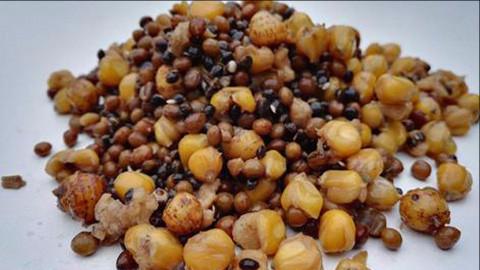
This is a really debatable issue as some people swear if you are feeding pellets you should be fishing pellets – I don’t agree (but do sometimes use pellets on the hook). My go-to method is to use a light coloured small boilie and this works really well for me. The carp aren’t really going to miss a boilie sitting on the top of the pellets! Corn or maize is another hook bait I like to use when fishing a method feeder, it’s a great visual bait sitting on the top of the feeder.

Number 2 – Skreting pellets

These are more of a standard fishing pellet that you can usually find for sale in your local tackle store- They usually look like the store has bagged them up themselves. These can be bought in these bags or in bulk bags from larger suppliers or on eBay.

These are a great pellet for fishing at long range and you can leave them in for a while longer if you use my method for soaking them.

Soaking pellets method

  1. Fill a tub 3/4 full of pellets, using either the 2mm or the 4 mm pellets – you add a flavouring at this if you wish – recommended.
  2. Fill the tub with water to around 1cm-2cm above the pellets, or a mix of water and beta stim liquid.
  3. Leave overnight and then get out on the bank.

These pellets will expand to almost be like a sticky paste but still pellets if you get it right. This means you can mould it a little in the feeder for a different presentation. It also lasts longer on the feeder. This is a video from my youtube channel showing how the pellets expand in the feeder. It really pushes the hook bait higher and higher in the water and the bed of pellets keeps expanding.

I’d skip towards the end as nothing really happens and I don’t catch anything in this video! It’s just always interesting to see what your bait does underwater. This was filmed on my water wolf HD – review here, in April time in a lake with visibility of about 2-3 feet at this time of year. The bottom is mainly clay with weeds coming up in June time and dying off in August.

I find the pellet feeder best for when the weeds are lower and especially good for catch carp in volume up to about 10LB. I have caught bigger on these feeders but the average I catch is around the 6lb to 8lb mark.

Number 3 – Bag up baits spicy sausage and halibut

These make the list due to their flavour and mixed colours. These are a good bait to have on hand on lakes where the feeder is heavily fished. It just gives you a nice differentiator rather than the usual coarse pellets. These are the type of bait I’d look for on busier commercial fisheries where you need something different at times. If you’re unsure at a venue I’d personally take a bag of these and a bag of the Sonubaits and swap between casts. This will help to find the feeder that works best for you.


These are prepared with a quick soak and can also be used as a loose feed. These are micro pellets and can be fished with any banjo or pellet feeder. I’d say they have a casting range of about 20-30 meters but I personally stick to the margins and smaller waters with pellet feeders.

Hook baits for method feeder fishing

Now we’ve got the pellets sorted it’s time to think about the hook bait we should use for fishing this method. I know there’s a school of thought that says if you feeding pellets you should use a pellet as your hook bait. I personally don’t subscribe to this view. Fishing a 4mm pellet on the and then an 8mm-10mm pellet makes no difference if it’s a boilie of a pellet on the hook in my opinion.

I always fish a boilie on the hook on these feeders and have had great success when fishing a white boilie as the hook bait. You can see my best small boilies guide here for some tips on exactly which baits to use.

If you have any questions about method feeder fishing drop me a tweet to @casual_carper or find me on Instagram – search “@Casualcarper“.

Posted on Leave a comment

Pre Baiting Tips: My guide to getting the best results

Pre baiting header

I’m a big believer that pre baiting gets results on the right waters. It is something I’ve been doing for years on the quiet waters that I fish and it always produces carp from the spots. Where ever I fish I will always have a number of spots on the go depending on the size of the lake. 

My tactic change from a military style operation on unfished lakes to just dropping baits on certain spots when I’m down on quiet waters. This can be done to get the fish feeding but is also a great way to keep my spots clear to target at a later date. 

Here’s what you’ll find on this guide. 

Whats on this guide?

Top 5 tips for carp pre baiting

1- Have a plan and stick to it!

I’m going to kick off with a planning tip rather than anything about baits and areas. For me, the most important thing is to have a clear plan and to keep it up. Make sure your plan is realistic and achievable. If it’s a 2 hour round trip to the lake then you planning to go every day probably isn’t realistic.

Formulating a plan at this point is the best way to start. If it’s a big job then double up with a mate or 2 and cover multiple spots on the same lake.  Once the plan is clear and in place then you can start with the baiting. 

Here are some things I consider when planning to pre-bait a lake. 

  • What time of day am I going to be fishing? If I can get the bait going in around the time I’d be arriving to fish this will help get them feeding at the right times for me.
  • How busy is the lake? Most lakes are busiest on the weekends so having a plan for weekdays is usually best.
  • How much bait can I afford to put in? Pre-baiting can get expensive, especially if you are using boilies in the warmer months as putting 5KG on a spot 3 times a week is pricey!

2 - Start with particles

In my opinion, particles are the ultimate bait for pre-baiting swims. The fact they are cheap really helps when you are pre-baiting spots regularly. They are also a great bait to get the fish feeding and grubbing around.

If you start your pre-baiting mission with something like the parti-mix from Cheshire particles (shown below) you’ll be able to get fish with their heads down grubbing around on the spot for the food. 

Parti mix - perfect to get them grubbing on the spots

If your spots are in the margins then you can see the effect of this approach. I have seen spots triple in size from feeding particles on them, this really helps to get them feeding as well as giving you a big clear spot to go at when fishing. 

If they are feeding well on the particles then you can add in boilies or pellets as well or just keep it to particles. A couple of scoops of parti mix on a clear spot with a nice yellow hook bait, like artificial corn will usually produce you a bite or two. 

3 - Target multiple spots

When pre-baiting I’m always thinking about where I can fish when the time comes. I like to make sure that if the peg I’m taking has been taken then I have other options to pick from.

I like to target the more unpopular areas with pre-baiting as it increases the chances of getting that peg when I get down to the lake. Look for the small bays that go unfished and start there. Or in a lot of cases, just target the furthest spot from the car park! 

These are usually the areas where the fish are found less often but they will visit. If you can get a nice quiet spot and get them feeding you’ll stand a much better chance of catching the, when the time comes. 

4 - Ask the owner

For this, you need to know the owner and trust them! 

If you have a good relationship with them then you may find that they’ll bait some spots for you. Afterall more feed going in will mean bigger carp in the lake. 

This does carry risks as they may tell other players but is a way to get the spots fed without having to visit the lakes as regularly. I would only suggest this where you feel it’s worth doing and you really can’t do it yourself. I usualyl find that pre baiting is a better option on syndicate lakes rather than commercials. 

5 - Mix up what you are feeding them

This again comes down to planning your approach. Here I don’t mean keep swapping the feed, although you could mix it up, I don’t.

Think about what you’re feeding them and how other people fish in the lake. If everyone fishes boilies then you’re not gaining as much as an advantage as you could. If you feed them something they only see from you then your work can help to get them feeding confidently on what you are putting in. 

Here are some ideas – 

  • Chopped boilies – Get your ridge monkey chopper out and get breaking those boilies up. This takes some work if you’re putting a lot of bait in but the benefit of them feeding safely will pay off. 
  • Washed out boilies – This is a real killer of an edge in well-fished waters and one that is underutilised. Wash your boilies out in the water for a couple of days, dry them out and then rehydrate them with liquids. They’ll have the full scent of a boilie but will look like they’ve been in the lake for days.  

Un fished lakes

For a few years, I had a private fishery that was run with just myself and a friend fishing it. We had a small stock pool that was tucked out of the way and was run on a natural spring so it had pristine water and lots of naturals and weeds. 

After adding some stock we started fishing it after a couple of years. Even though it was a small lake it is still the hardest water I have ever fished! 

I did two pre-baiting campaigns and both brought results.

Strategy 1- This was in the summer. I’d go down 3 times a week on warm days and pile in nash riser pellets on the surface. If I had the time I’d stand and watch and see if they started taking. After 12 trips I still had not seen one single pellet get eaten, but if I went after a few hours they had all gone. 

When I went down for a session the fish started taking after around 2 1/2 hours and the big one was hovering them up. I flicked a dog biscuit in it’s path and landed the first carp to be caught in the lake for years – 

Strategy 2 – This was in the autumn. It was clear there was plenty of food in the lake naturally so a pre-baiting campaign was required at this time of year. I set about adding chopped boilies and pellets on 3 spots in the lake to see if they’d start taking. After 2 months of pre-baiting twice a week I found them on it with my under water camera – 

This spot taught me a lot about carp and their movements. I filmed the same spot with the same bait the next day and no carp visited in 4 hours. Shows that some days it’s just not your fault! 

Season by season

I tweak my approach depending on the time of year – 

Spring

In the spring I judge the amount of bait going in by the weather following trends. When it warms up I start to increase the amount of bait going in, usually a day or so behind the weather. If there has been a hard frost overnight I will vastly reduce the amount going in unless I’m going latest in the day. 

Summer

In the summer I mainly use particles as I’m happy to pile the bait in and get them feeding hard on the spots.

Autumn 

As the weather cools down the amount of bait I use follows the trend. If you want to keep catching them when it gets colder then keeping them feeding in the autumn. The carp will stay on the feed longer if there is a regular supply going in, in my opinion. 

Winter

In the winter I’m happy to drop down to just a couple of handfuls ar a time. I move may approach to where I’ve seen the carp as they are not moving as much. Pre baiting in winter can give you a real edge over other people on the lake if you feed tight spots and keep them to yourself! 

Questions

Got a question? Drop  me a mesage on socials below and I’ll do my best to answer. 

I think that particles are the best for a pre-baiting mission. They are cheap to use and get for getting the carp to clear and widen spots for you.

Yes, from my experience pre-baiting is one of the best ways to improve your catch rates when carp fishing.

Pre-baiting is a good way to help target carp on the canals. Finding the right spot to target is key so you will need some knowledge for the stretch before you start. 

Posted on Leave a comment

Spring Carp Fishing Tips: Where to locate them and what baits to use

Spring carp fishing tips

Spring is one of my favourite times to fish. The weather starts to warm up and there’s always a point where the carp seem to wake up and get moving after the slowness of the winter. Finding the right spots and approach in the spring can lead to some amazing results, even in short sessions. Here I’m going to share my best spring tips with you! 

Page Menu

Top 5 Spring Carp Fishing Tips

1-  Find the shallow waters

When the sun is out the difference in water temperates at this time of year can be stark. The shallower waters warm up faster, especially in clear lakes and the fish prefer to head to the warmer waters and stay there.

In April time, at the lakes I fish, you can often find a number of carp in a shallow bay that’s only a couple of feet deep. Identifying these areas when the carp move will help increase your catch rates. If you know the depths in a lake or have access to a depth chart, I’d always try and book the shallower areas all spring if possible. 

I often find targeting these areas later in the afternoon can be really productive too as that is when the water will be at it’s warmest if it is sunny all day. 

2 – Locate them every time you go! 

It is easy to think as it’s getting warmer they will be on the move as this isn’t always the case – especially in early Spring. At these times of the year, there can still be hard frosts overnight which sends the fish back down in the water and makes them more dormant. It is really important to pay attention to the overnight temperatures and try and locate the fish every time you visit the lake (although this could be a tip all year long)

3 – Move when you see them

I do think a lot of the spring tips carry on from the winter tips. If the lakes are quiet in early spring then moving to showing fish can reap dividends in sessions. If you are ready to move at all times then you’ll find getting on the carp easier than sitting in the same place all day.

Where possible, I like to trickle bait into a couple of spots on the lake and then revisit them a few hours later to see if there has been any activity. I do this in the shallower waters on the warmer days to see if the fish are moving into these areas. I like to feed the sorts with pellets of particles to get them grubbing around. This will stir up the bottom in the clear waters and show you if they have been active. If you have not got the time to fish then prebaiting spots when you get the chance can help with this approach too. 

4 – Surface on warmer days 

At the start of the year, the carp are less wary on the surface than in the middle of the summer as it is a while since they’ve been caught out on the top. On a warm day carry a bag of floating pellets, like Nash risers and put some in on the back of the warm wind. 

A lot of carpers seem to wait for the summer to start surface fishing but a late spring day can be just as good, if not better, in my opinion. 

5 – Follow warm winds & south facing banks

As you can probably tell from these tips the warmer water is the place to fish! On the bottom of warm winds is always a good place to start as this will be the warmer water plus the natural food being pushed down the lake. Bait these areas lightly and fish a bright hook bait for the best results. 

South-facing banks get the sun first in the morning and keep the majority of the sun throughout the day. These will be the warmest areas on the lake and they are good to target for this reason. 

6 – Use naturals

I’m always hearing people using the excuse that the carp only feed on naturals in the water. From my underwater filming I’ve never found this to be true, they’ll always take something. However, if you cannot beat them, then join them. Various companies now offer naturals for sale. Carp particles UK have a range of dehydrated snail meat as well as snail shells and ground mixes of both. These will give your baits a real natural zing in the spring and presented right can cath even the wariest carp. 

Best Rigs For Spring

In spring, I still like to stick with small hook patterns in the early months. I will then increase the size when the feeding picks up. Here are my go-to rigs –

Slip D

I fish D-Rigs and wafters for 80% of my fishing. It’s a pattern I’m confident with and it presents the bait well. 

Small PVA bag with German rig

When the feeding is light a small bag of pellets, particles or broken boilies can be the perfect way to get a bit when it’s tough going. For me, the German rig is ideal for solid bags along with a solid bag stem. 

Spring Baiting Up Tips

Early Spring:

In early spring I like to use little and often baiting techniques. Keeping small amounts of chopped boilies and particles going into my spots. On heavily fished waters spodding lots of baits will still work but I prefer to fish in quieter waters. Little and often works best for me in order to get them feeding and coming back to the spots where I’m fishing. 

If I have 2 rods out then I’m usually feeding 4 spots and looking to move at any signs of feeding on any of them. I like to always feed one in a close margin where I can keep an eye on it for anything getting its head down for a munch. 

Late Spring:

There’s always a turning point in the spring where the fish really get on the feed. Keep an eye on local catch reports to see when this is. I personally find it after a period of between 2 and 4 days of warm weather with mild nights. At this point, I really step up the amount of bait going into the spots and try and get them heads down and steaming through the bait. 

Pre baiting? 

Pre baiting spots is something I’m doing all year round! If the lakes I’m fishing are quiet I’m always trickling bait in to clear spots that I’ve found, usually as I’m leaving the lake. On the lake I fish currently, I’ve got 5 spots on the go, meaning when It’s busier I know I’ve always got a spot to fish to with at least 1 rod where they are used to seeing bait. 

Questions?

For me, the best bait to use in Spring is broken and glugged boilies along with particles. The boilies have a high level of scent to attract the fish and the particles are excellent to get them grubbing around for food. 

My rig of choice is a D-Rig with a hand-sharpened hook in the spring, usually with a size 6 or 8 hooks depending on where I am fishing. 

I usually find they switch on to feed in April in the UK when the weather has warmed up. This can happen in late march if there is a long mild period of warmer nights. 

Some other tips you may like to read
Follow me on social media for the latest tips
Posted on Leave a comment

Micro Jig/ lure Fishing Tips

Micro jig fishing

When the colder water comes I turn my attention, at times, to jig and lure fishing – mainly for pike and perch. You can fish like this all year round but it’s better for the pike to catch them in the winter. Fishing with micro jigs and lures is great fun especially if you can only get out for short sessions. Carp fishing can be tricky in the winter months if you only have limited time. If I only have a couple of hours space I’ll grab my spinning rod and head to a quiet lake or take a stroll down a stretch of canal where I have a winter ticket. Find the right spots and the fish will keep coming.

Getting started – what you’ll need

If you are new to micro jig fishing then it is relatively easy to get a setup. If you have another smaller fishing rod or reel this could be converted to jig fishing if suitable.

Here’s a list of what I personally use for jig fishing –

  • Rod: Korum 7′ 6″ spin rod (micro jog rods are available too, I just prefer a spin rod)
  • Reel: SPRO freestyle smoke screen front drag
  • Line: Berkley fireline – A mono, braid mix that is a personal choice of mine, the braid is the standard line for jig and lure fishing.
  • Jigheads: 1 gram size 6 are ideal for this size of micro lure
  • Rubber landing net – With this mobile type of fishing a folding net is a good option.
  • Lures: A 38mm lure is a good place to start (I use these ones in the sliver and green mainly) Shown below

If you are looking for an entry-level rod then Angling Direct have an Advanta 7 foot spin rood and reel combo for around £18. You’ll need to swap the mono that comes on the reel for a braid.

Other things you may need

If there is pike in the water

  • Forceps
  • Wire trace
  • Predator gloves

Micro Lure Fishing Tips

I’ve done a lot of micro jog fishing over the years and it as a tactic I go to for short sessions, mainly when the weather gets colder. If I don’t have long enough for a carp session I’ll grab my spin rod and go off for a roving session round a local still water or down a stretch of canal, I have a ticket for. This type of mobile fishing is great fun and with tiny lures, you can usually catch plenty of fish and a good range of sizes and variety, even more so on a good stretch of river.

1 – Keep mobile

Don’t weigh yourself down with gear! I have one rucksack that has a side pocket for rods and I keep my small lures and setups in it. If I want to go I can just grab it and go. Keeping moving helps you find more fish. If you’ve fished a feature or area for 10 minutes and not found anything move on to the next spots. Some times you’ll find the best looking spot hasn’t got the fish in it at that time.

On one of the still waters I fish for perch some spots work on some days and other days there’s no fish there. Keep moving until you find some spots. If a spot looks good but has no fish then either come back to it later or note it down to revisit on another day and have another try.

2 – Use decent polaroids

This should be a given for predator fishing. With a decent pair, you can often see the fish in the margins and in clear water. I’ve caught may fish that I’ve seen with my glasses but would not have seen with the naked eye. This includes standing watching perch take my bait and watching pike waiting in the margins too.

I use these (Fortis Eyeware overwraps). They are designed for glasses wearers but can be worn by anyone, the side panels really help block out the light making them more effective. The only downside is, as I’ve been told, they’re a bit, Lady Gaga, lol!

3 – Look at the local match results – canals and rivers

If you are lure fishing for predators you want to know where the fish are. Find the shoals of slivers and you’ll find the larger perch and pike. This is especially important when targeting canals and rivers in the winter. Check the local clubs and forums for the match reports and see which pegs had the biggest weights caught. These are likely to be the areas that are holding the fish. Head for these areas to start with and keep moving around them looking for signs of fish. This can make a big difference between a good session and a bad session.

4 – Ask around!

This seems to be overlooked

Best micro lures

Best Rods

On canals

Challenge ideas?

Winter

Species to target

FAQS

Posted on 1 Comment

Supermarket Pike Baits

Super market pike baits

The supermarket fish counter has a range of fish that can be used for dead baiting for pike. Fortunately, pike will eat almost anything fishy so there is a good choice of dead baits available regardless of what’s on offer. Here I’ll cover my top 3 dead baits for pike from the supermarket!

*Even though I’m the casual carper I do fish for pike & perch as well as carp. There are some underwater pike videos and tips that you’ll find on my YouTube channel here.

Top 3 pike dead baits from supermarkets

1 – Sprats! Best for short-range

Sprats are a small oily silverfish that make an awesome pike dead bait – Mainly because they look like a small roach. These are really cheap to buy from any supermarket fish counter and they usually come pre-packed for around £2 which will get you 15+ sprats. You can freeze them and then get them out when needed so you do not always have to have fresh fish out. I usually have a couple of packs in the freezer for whenever I am going.

Super Market Sprats

They can be fish as bait on a standard running rig and they are also suitable for wobbling tactics.

I have rated them as the best for short-range fishing as they are a bit of a pain to hook and cast. Their skin is not as tough as, for example, mackerel and they can fly off if you give them a real launch. I find it best to hook them through the lip and then the by the tail and try and cast lightly if possible rather than flying them over a long distance.

Here is how they look underwater – These are some free offerings on a clear spot that I took while filming some pike – video on YouTube here)

If you are looking to add some attraction to the water sprats can be sliced open to let more oils out or chopped and mushed to really let a strong scent out in the water. Chop them up widthways and then mash them up. You only need to do this with  2 or 3 to get a great aroma around your spot.

2 – Mackerel fillet – Best for long-range

Mackerel in the supermarket comes in a variety of formats from the whole fish, to the whole body to the fillets. My choice from these is the fillets, they are really easy to use and I have no problems with casting them a decent distance. They have produced numbers of pike for me and are my go-to bait for casting. Again, I usually have a couple of packs of these in the freezer.

You can fish with them from frozen as they will defrost in the water but I prefer to defrost them in the fridge overnight before a session. When on the bank I trim them down to a triangle shape that is roughly 5cm bigger than my treble and cast that out. I find the triangle shape gets me more bites than others, I guess as it more represents a fish shape. If you are going for bigger pike then you can use bigger treble and match that size where needed.

You can buy them fresh from the fish counter or frozen in the freezer isle –

This means you can just grab how many you need before a session.

Here’s a recent catch on the mackerel fillets, not a big one but this day brought me 9 runs in 4 hours on the legered dead bait. I picked up the mackerel from Tesco on the way for this session. I have seen some pike forums a question mark over the quality of supermarket fish v that from the tackle shop. From my experience, there isn’t any different and I have no issues using supermarket baits.

Pike on a sunny autumn day caught on mackerel from the local supermarket

3 – Sardines

Sardines are more of a backup bait for me. Again, like sprats theses are a softer bait and not suitable for constant casting and retrieving. They are also not the best for wobbling dead baits but do have some days when they will get me bites and nothing else will. Here we are looking to buy fresh fish from the fish counter and not the tinned versions!

Posted on Leave a comment

Bait Sprays : How to maximise your catch rates

Bait sprays are a great way to boost your hook baits. My spray is made to be an intense flavour to match the hook bait range and make the all-important hook bait stand out. They can also be used to boost any of your baits, from surface baits to spraying your PVA bags before casting.

Lighter in density than a glug, bait sprays won’t add too much weight to your popups or overbalance your wafters. They are a quality tool to have in your tackle box to help get more bites, especially on tricky waters. The spray helps to give an extra zing to your hook bait without affecting the rig.

How to use Bait Sprays

There are a few uses for bait sprays aside from the simple – spray before you cast. This is the most common usage for them and how I personally use them before every cast. This is especially important in winter fishing where you may be fishing singles – the more potent the hook bait the better.

Solid bags

I’m a fan of fishing solid bags and use the spray in the top of the bag once it’s filled. This gives another level of flavour to hit out as soon as the bag melts and can be used in conjunction with other liquids, such as glugs.

Zig Fishing

Bait sprays can be used to boost up hook baits or foam on a zig rig. They are an excellent way to add an extra zing if you are fishing foam on a zig rig.

Spraying hook baits

If you have the time to prepare then you can use my sprays as a soak for your hook baits if you need to keep the lightness of the popup. This is a different method to glugging them and increases the flavour without adding the weight that glug does.

In my experience, the best way to do this is to have a few in a pot, 1 layer of baits so you can spry them all. Give them a couple of sprays, then a shake and then a couple more sprays. Repeat this every couple of days for a week and you’ll have a really potent hook bait that has an extra level of scent. You can also mix up the scents by using a none matching spray – I often use my garlic, tiger nut and peanut spray on my pineapple wafters to give my hook bait a twist and make it stand out more.

Artificial Baits

My bait sprays can also be used on artificial baits such as fake corn or fake tiger nuts. These are usually unflavoured so using a bait spray can give you a real edge underwater.

Posted on 2 Comments

Boilie Glug: The ultimate guide!

Boilie glug guide

For me, boilie glugs are an essential part of my carp fishing. I use them to boost spod mixes, particles and to glug hook baits. They’re an essential part of my awesome winter mix (crushed and crumbed boilies that are heavily glugged) and I hone the mix in the summer to keep the effectiveness but add more food sources and visual stimulants to it.

How to Glug boilies

Here’s how I glug my shelf life boilies for added attraction. This is something I do all year round to give them an added attraction. In the summer months, they will all get a light coat of glug and in the winter I’ll use a heavier coat or dip to boost boilies and hook baits. (scroll down for my dip tips).

This mix should be prepared roughly 24 to 48 hours before your trip. In the winter I have a bucket of crumbed boilies on the go for months and just keep topping it up when needed.

Step 1 – What you’ll need

Grab your boilies! The example below shows my Salted Caramel Nut boilies with a matching glug. This is a potent combination when mixed together and has bagged me loads of carp using this exact mix. These are hgh quality boilies that I sell in my online store. They are perfect for glugging and crumbling down.

  • Shelf Life boilies
  • Matching boilie glug
  • A large mixing bowl and spatula

I’d recommend starting with 1kg of bait and seeing how you get on with the mix, you’ll want the bait to roughly half fill the bowl. You don’t need to use a matching glug if you’d prefer to mix it up you can vary it, or use 2 different flavours.

To give an extra edge in summer I often add around 10% of the boilies which have a different colour to make it more visual. For the mix the better quality the boilies the better. This is all about maximising the flavour from both the bait and the glug.

Step 2 – The base mix

To start with we’re looking to just get a nice coating on all the bait so start with a small amount of glug, around 50ml – roughly 10% of the bottle. Then mix them around the bowl using the spatula to make sure the liquid doesn’t stick to the sides of the bowl too much. Lightly mix them around until you can see they all have the liquid coating the baits.

If you just want an extra boost to your boilies then you are done now. Put them in a tub or bag and leave them until you are ready to go to the bank, or read on for extra additives. If you are leaving them for a while give them a regular shake to keep the distribution of the glug around the baits.

Step 3 – Additives

If you want an extra boost there are a few other options available to you, that I like to use to mix it up at times.

  • Use boilie crumb in the mix – This is one of my favourite mixes. You need to use a smaller amount of boilies and a higher concentration of glug. For this, you need to get the boilies really well coated in the liquid and then leave them for around 24 hours. Then get some boilies in the grinder (I use this one from NGT – here)and grind them down to a fine crumb. Add this to your glugged boilies and the crumb will stick to the outside giving you a coated boilie that’s packed with attraction and will stand out against other people fishing with standard baits.

For the above mix a 1KG bag of boilies and split them roughly in 3. Break a third of the boilies in half, roughly break up another third of the boilies and then fine crumb the other third.

Take all the halved and roughly broken boilies and half of the crumb and heavily glug it so it’s sticky. Then leave it overnight.

The next day when you head to the bank add the rest of the crumb to absorb any of the extra liquid. This is a great mix for the winter months. For the warmer months reduce the amount of crumb if there are coarse fish in the lake.

  • Use additional liquids – You can easily add other liquids to the mix for variety and oils work very well in the summer months.
  • Add other feeding stimulates – Mix in a few other boilies from a different flavour and colour to visually stimulate the carp. As the weather gets towards spring start adding more boilies and possibly some sweet corn to the mix.
  • Mix with particles – If you are using a crumb and broken boilie mix then add in some particles for a feast of colours, flavours and attractants.

Glugged boilie crumb also makes an excellent addition to solid bags. Rather than filling them with pellets, you can crumb your boilies down to almost powder and then fill your bags with them. Make sure you make around what you need is it does take a considerable amount of glug to soak into the crumb. This then creates a cloud of attraction around your hook bait to attract the fish in with.

How to make coated boilies

This is a way to use glug for a real edge to your fishing and it’s not a tactic that is used by many. To start with glug your boilies or hook baits for a couple of days and make sure to keep shaking them to get them fully covered in glug. Then drain the liquid off them and leave them for a couple of days in an airtight container.

When they have a sticky outer coat add some finely crumbed boilies to the mix and give them a good shake to get the boilies coated. Then leave them for a further couple of days for the crumb to stick up to the outside. This gives a very quick attraction to your baits as soon as they go in the water.

How to glug hook baits

I’m also a fan of adding glug to my hook baits such as popups and balanced wafters. You’ll need to take into account any liquids they take on will reduce their buoyancy.

To start with, take a pot of your hook baits and cover them in the glug.

I’d generally leave them like this for a few days and then drain the liquid off which over time will leave them sticky with an added attraction. Again you can add a crumb coating at this point. If you are not fishing with them for long periods of time and don’t mind a loss of buoyancy then you can leave them in the liquid indefinitely. If you are doing this then it is advisable to give them a shake every now and again to keep re-coating them to avoid them drying out on top if they are out of the liquid.

This is what I do with my wafters to give them a real kick but allow them to stay light enough to fly up into the carps mouth when eaten.

How to use a boilie dip

Boilie dips are a great way to boost your baits just before the cast and my range of glugs can be used for just this. Take a smaller container, I usually use an old lid for single hook baits, and fill it with glug. Just drop your hook bait in before you cast for a quickly added boost to your hook bait. I usually have my next rig tied up and ready to go on the bank so just leave the bait in the dip until I’m ready to use it.

I really like this sweetcorn one from Ourons – See it here. In the summer it can work well fishing a trimmed yellow wafter alongside sweetcorn with the hook baits dipped like this.

Again you can do this with oils in the summer months or the beta stim liquid. These can also be used to add potent flavour to bread when you are surface fishing too.

FAQS

How long do glugged boilies last?

If they are shelf-life boilies in a sealed container they should easily last a month or more, it’s best to just keep an eye on them. Store in a cool dry place out of direct sunlight. Give them a shake regularly to keep them covered in glug.

If they are hook baits in a sealed pot then they will last for months without a problem as long as you store them in a cool dry place out of direct sunlight (as you should even if they’re not glugged).

Posted on Leave a comment

Throwing Stick Tips

Top 5 throwing stick tips
I’m a big fan of using a throwing stick rather than a catapult and have a couple of sticks that I regularly use. I find them a great way to get bait out at both short and long distances and I like the spread of boilies they put out. They can be a tricky thing to use when you are first getting started but with some practice and a few tips, you can really hone the skill to be really accurate every throw. I’ve recently added a short-range throwing stick to my collection. It’s a great addition as it makes getting your bait to a close margin or island really targeted. If you are fishing to overhanging trees with a bit of practice you can skim boilies under the tree too. I’m going to start with a beginners guide to using a stick, if you want to get straight to the tips click here – Top 5 Tips.

How Do You Use A Throwing Stick?

  1. Get the right size stick for your boilies
  2. Start with 1 boilie a throw
  3. Find a spot on the far bank to aim at as a guide each time
  4. Hold the stick back so it is level with your shoulder (you should hear the boilie roll back down to the bend)
  5. Flick your wrist quickly to launch the boilie
Take some time to practice with 1 boilie at a time and see the different distances you can get on the throw. Once you have mastered it a little more then you don’t need to stop by your shoulder and can just launch boilie after boilie in quick succession. Common issues Boilie lands short – If you launch it and pull the stick over too far then the boilie will sometimes land in front of you. In this case, stop the launch a little earlier trying to keep the stick straight as shown in the video. Boilie goes high – This means you’ve stopped the throw too short, or not been quick enough in the snapback. You need to try and get the movement faster and more fluid to get it coming out at a better angle.

Top 5 Boilie Throwing Stick Tips

Here are my top 5 tips followed by some frequently asked questions

1 – Use the right stick

With throwing sticks it is not just a case of buying one and use it whatever the conditions or lake. Having the right stick for the peg you are fishing will really help you improve your usage of them. I have a couple of sticks that I always have with me for different size boilies and different lengths. I have an 18mm long range stick and a 15mm short-range stick. The short-range stick will possibly get them further than a catapult but for me, it’s easier and more accurate. On a recent social session, at Ghorsty Hall lakes near Crewe, I was hitting around 44 meters with the stick with standard boilies and little effort. With a little more effort and wetting the stick, a range of around 50 meters would be about the limit. Short range throwing stick distances On the larger longer-range sticks a range of 100 meters and above is achievable with the right bait and practice.

2 – Use the right bait

Getting the boilies right is essential when going for longer distances.  If you find your boilies are splitting under the pressure when throwing long distances then it’s best to air dry them out overnight to make them a little harder. This will again aid you in getting more accurate over longer distances. My Casual Carper boilies work well in throwing sticks – You can see my full range of bait here.

3- Wet the tube

This is another trick that can help stop splitting and get some extra distance. By wetting the inside of the tube the bait slips down easier and has less pressure to fly out of the end. If you have not had a chance to air dry tour boilies and even with a wet tube they are splitting you can try wetting the boilies before you send them too.

4 – Send multiple boilies at once

Once you are used to the stick you can start getting more and more boilies in them. This is really effective if you are looking to create a good spread of boilies. Build up how many you use as the technique varies slightly with the more boilies you put in. As a general rule, you need to flick faster the more boilies you have in the stick. ** Don’t mix sizes or types of boilies in the stick – They will all go different distances and really reduce your accuracy. Here’s my guide to stick sizes and how many you can send accurately.
  • Short-range stick – 6 seems to be about the optimum for keeping a decent distance on them. If you are using it on a shorter range than the maximum then 8-10 is possible but it does create a wider spread than it would be using a catapult from my experience.
  • Long-range stick – With a longer stick 10-12 seems to be around the optimum for maintaining distance and accuracy. This does depend on the size of the boilie too in the longer-range sticks.

5 – Create a pattern to fish

Firstly remember that this isn’t the same as spodding! You are not looking to feed a really tight area more create an arc of bait and position a hook bait at each end of the arc. for me, this is a good way to fish on a lake where there is a lot of spodding going on (as long as you have enough clear water to do it in). The stick makes less disturbance on the water and the arc and spread is designed to get the fish moving around the area picking up bait rather than getting their head down on one spot. Here’s an example – you may want to keep the arc tighter and fish closer than shown below depending on your personal preference. Feeding with a throwing stick
Other Carp Fishing Tips
Posted on Leave a comment

How To Setup a Carp Blog

How to start a fishing blog vlog or youtube channel

If you want to set up a carp blog/ vlog then here is everything you need to know!

Use the comments at the bottom of the page if you have any questions, or message me on Instagram @casualcarper or Facebook /casualcarper.

As an initial background, my day job alongside running Casual Carper is working in online marketing. I’ve set up numerous blogs, websites and Youtube channels for different companies and have a good knowledge of what is required.

I’ll cover options on how to set up both completely free as well as some recommended purchases if you do want to set it up a level from the start.

What is best a vlog or a blog?

In my opinion, this depends on the person that is producing it! If you are happy to be in front of the camera recording then a vlog would be the one for you, if you prefer to write and not film then a blog website would be the one to go for. If you have the time then you could set up both and run them alongside each other.

I’ll start things off with a Vlog/ Youtube channel – If you want to read about setting up a carp fishing blog/website click here.

How to set up a carp vlog

What you will need to get started

  1. A google account (any Gmail email, android login or youtube login)
  2. A phone with a decent or at least a reasonable camera
  3. Editing software – You can find free apps for your phone to do this or online software that you can use.
  4. OPTIONAL – A tripod! (I use this one – Tripod on amazon) You can find suitable ones cheaper than this but I find this one is easy to get stable on the uneven ground due to the adjustable legs.

Step by step guide

Step 1 – Register a YouTube account and set up a channel

Here> https://www.youtube.com/create_channel

It is important to think about what you want to call it t this point as it’s tricky to change the name once registered. Think about what you want from the channel, if you are looking for advertising, free stuff or sponsorship then its best to keep it friendly and professional. Here are some ideas

  • NAME Carp Blog
  • REGION Carp Blog
  • NAME Carp diary’s

Or you can go with popular phrases about carping

  • Clipped up blog
  • Full-zip carping
  • Park lake carping
  • Day ticket carper

Just check on youtube and Google that no one else is using that name already.

Step 2 – Set your channel up correctly

This is the first step in getting more viewers on your content because that’s what you’re after right? Having a good looking channel helps.

Make sure you write a description of what your channel is about.

Add links to your social media pages.

Create a channel art header (Free here: https://snappa.com/create/youtube-channel-art)

You can also subscribe to other channels from your account which can help people see what content you are interested in. (You can subscribe to the Casual Carper channel here)

Step 3 – Make your first video

Take some time about this, there is no rush to just post anything.

Here is the process I use when planning out new videos (You’ll find lots of older ones on my channel where I haven’t followed this and it shows). It may be a good idea to check out other channels and see what videos are popular.

  • Start with an idea – What is the video about? What do you want to film and why. It helps to focus your first video on something you are comfortable with – a familiar lake, familiar tactics etc.
  • Storyboard your video – This does not need to be amazing – I just do a very rough sketch, just a guide to what clips you want to film and where they will go. Try and take some extra shots to fill in the gaps and make the video more interesting.
  • Plan your trip – Make sure you have everything you need
  • Film – Don’t worry if you need a few takes to get things right, do film more than you need and you can edit it down later.
  • Edit – Get all your videos and get them edited together so it flows nicely through the content. Trim out any bits that don’t seem right.

Some tips for your video

Do some voice-overs

You don’t need to film yourself talking the whole time. Film some silent sections or add some photos to your videos and talk over them in the editing. This will make it seem much more professional and easier to watch. No offence, but no one wants to watch you chatting in your bivvy for half an hour!

Select a good thumbnail

A custom thumbnail is a screen that shows up when you search on Youtube. You need to upload a few videos before you are allowed to add custom ones. Before this it has to be from a clip in your video – you have to pick from the ones they suggest so pic the one that looks the best – usually, one with a carp in it helps.

Add an end screen

Every video should have a 20-second end screen. This is where you can encourage viewers to subscribe to your channel or watch your other videos. Once you have more videos you can use this to promote your most popular content to viewers. (Build one free here https://snappa.com/templates/youtube-end-screen)

Write a decent title, write a description and add tags

The video description is one of the most important things for getting views. You can use it to appear in more search results and get more people to click on your video. If you are fishing a known lake then make sure you use the lake in the title too – people are always looking for videos from lakes they are going to. Here’s a simple example

Poor title

Simon fishing session 25/2/20

Decent title

Winter fishing session at Linear B2, fishing solid bags, see the full bag and rig setup and what I catch from peg 5.

The same goes with the description. You don’t need to write thousands of words but a couple of paragraphs about what the film is about will help boost the rankings further. YouTube needs to understand what your video is about and the title and description are key to that.

Tags are not a huge ranking signal on YouTube anymore but they do again just help to nudge YouTube into knowing what your video is about. There’s no need to overthink this, just add 5 natural ones “carp fishing flog” “day session” “Farlows lake” for example.

Add closed captions

This one is more of a pain! YouTube tries to understand what you are saying in your videos but its a bit hit and miss. By going through your video and adding the dictation it makes your video more accessible to any deaf users and this helps stretch your reach further (It also means people can have a sneaky watch at work and just read the transcript!

Use playlists to categorise your content

This is a tip from Ricardo who does some filming for the Casual Carper YouTube channel. You can see his channel here and find him on Instagram on @backonthebank_

Once you have a few videos uploaded playlist help to categorise your content for visitors. By getting people to select a playlist rather than just one video people will watch more videos and you’ll get more views. This can also help you raise your profile and get more subscribers in.

Channels to check out

Here are three channels to check out for inspiration!

Carl & Alex fishing (Channel here)

Carl and Alex have one of the biggest non-brand related fishing channels on YouTube and have been around for over 5 years. They are full-time YouTubers and now have sponsorship from major tackle companies. Some of their videos have over 750,000 views and they produce all-round fishing videos, not just carp fishing. They also do some great challenge videos.

Back on the bank (Channel here)

Ricardo has a relatively new YouTube channel but is an experienced video maker and this shows in his videos. Featuring drone footage from his sessions and quality recordings, this is a channel to check out and keep an eye on!

Danny’s angling blog (Channel here)

Danny’s is a coarse fishing blog with a bit of carp fishing. I really like how natural it is and this has helped him to grow the channel to over 6,000 subscribers and gain sponsorship from Korum and others. Danny’s blog is a great example of using playlists to categories your content.

Other resources

If you want to get more in-depth about your videos then here’s some further reading that may help

YouTube SEO –

Full guide to ranking your videos: https://backlinko.com/how-to-rank-youtube-videos

Brian Dean (Banklinko) is an internet marketing expert who will help you get the absolute maximum from each of your videos.

Video editing

7 beginners mistakes to avoid: https://www.techsmith.com/blog/common-video-editing-mistakes/

8 pro editing tips: https://www.makeuseof.com/tag/8-tips-editing-videos-like-pro/

Posted on Leave a comment

Resting your swim: The ultimate guide

Swim resting carp fishing

Resting your swim is an excellent way to get more fish on the bank by fishing less. In my opinion, it is one of the most underrated tricks in carp fishing and is especially suited to commercial waters and longer sessions. You can do this as one of two ways, either resting the whole swim or resting part of the swim. The whole swim method works best with the past sim technique a good side option for getting a fish out from a different spot later in your session. Here I’ll cover tips on both.

Resting your whole swim

This mean sitting in your swim with no rods in and it can be tough to stay disciplined enough to get the full effect. Here you put your bait in and wait a set amount of time before putting your rods in. It can be very tempting to cast in at the first sign of a carp on your spots but the idea is to get a few in the swim and feeding confidently before casting in. Despite what you may think catching one from your spot will not spook the rest.

Imagine turning up at a lake like Linear and arriving for a 48-hour session on a peg that had been rested and baited up for you. This is what you are aiming for. By taking your time you can almost draw the fish into your peg while all the other pegs are pressured.

Resting your whole swim tips

1 – Keep the bait going in 

Make sure they have some bait to eat without spodding every 5 minutes. A good way to do this is to get your spodded bait out early if you want to spod at all, and then top up regularly using a throwing stick. This keeps a good stream of bait going in without creating too much disturbance. Personally I’d set up two baited areas in my swim, one would be an area that is well baited from a spod or spomb, and one that has purely high leakage boilies going in. The little and often baiting technique is again a rare one to see on popular commercial waters. From what I’ve seen underwater filming and watching other underwater films the carp are more likely to keep visiting a spot to pick up bits of bait rather than steaming through heavily baited spots.

2 – Set a time and stick to it

I’ve spoken to a number of carpers about this and most find the temptation gets too much for them. After a few hours of resting the rods go in and it becomes almost a normal session. I find it is best to set a time in your mind that you are going to put the rods in and stick to it.

3 – Soak your hook baits so they match

If you’re feeding food source boilies and fishing them it may be beneficial to soak your hook baits for a while so they blend in with the bait that is still on the bottom. The theory here is that if there are some baits on the bottom after 24 hours they will look significantly more soaked and washed out than newer bait going in. This may just help to edge out a wise old carp out of the lake.

4 – Keep the disturbance to a minimum

As mentioned above if you are spodding then I would advise only doing this at the start of your session and not constantly throughout it. The carp are well aware of the usual noises and by leaving the rods out and keep ing it quiet it can help to draw more fish into your swim. Get your rods ready and clipped up to go at the start of the session so as soon as it is rods in time you can cast them in with the minimum disturbance on the bank and in the water.

All in all, this is an excellent technique to getting more out of your session even if it feels a little weird sitting in a swim with your rods out!

Here is a video of one of my top team members Riccardo (Insta: @backonthebank_) resting his swim for 24 hours of a 72-hour session at Farlows-

Resting part of your swim tips

This is not my chosen method as it still means having line pressure in the water at all times. The size of your swim will dictate how effective you can be with this. Again it takes discipline to be successful.

Here is an example of how to keep half your swim clear of rods –

Resting an area of your swim

On most waters you would find people fishing out in the middle and keeping an area baited in the margin can produce results. This would work best using a little and often strategy with a throwing stick popping boilies in at a regular rate. Depending on the length of your session you could leave it a while knowing your rods were on another spot and us it as a spot for the last few days. Alternatively, keep your eye on it on a shorter session and put a rod on it when you see some carp activity in the area.

The advantage of doing this on a margin spot, depending on the size of the margin, is you can usually get your rod in quietly if its a shorter cast or an option to drop in and walk back with your rod. Keeping the disturbance to a minimum really helps this technique work at its best. If in the example you were in peg 8 then I would be keeping as quiet as I could on the bank to not add any disturbance coming from my peg.

I hope these tips will help you in resting your swim and catching more carp! If you have any questions please feel free to get in touch in the following ways:

Insta: @casualcarper

Facebook: /casualcarper

Twitter: @casual_carper

YouTube: Casual Carper Channel