I’m a big fan of gadgets and when I saw the fish spy I thought this would be another one for the collection. I picked mine up just over a year ago and have used it a few times since. For comparison I also have a couple of Water Wolfs and a Deeper Chirp, you’ll find reviews of these on the site too. Firstly I will talk you through the setup, then some tips and then my opinions. If you are thinking of buying one, have a read of my review further down the page here to see if it the right thing for you.
How to set up a Fish Spy
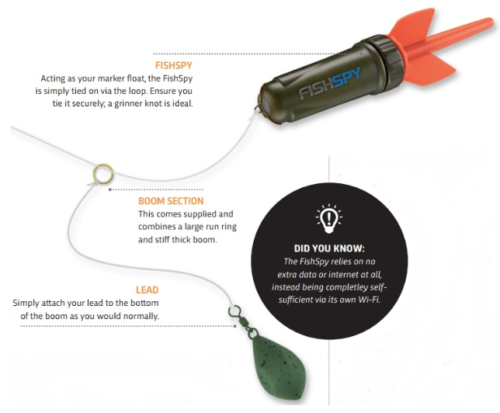
The setup is the same as setting up a marker float, which in effect it is. Here is how it should look, taken from the Fish Spy website.
If you have a marker float setup or rod ready you can just switch your standard float to the fish spy and then you are ready to connect.
Connecting your Fish Spy
All fish spy’s come with a unique number that you need to have to connect the device to your phone or tablet. This is its own WIFI signal. The number you need is in the paperwork, or if you cannot find that then connect your Fish Spy to a computer via the USB connection and it will show the name. It is usually fish spy-XXX where the XXX is your unique number. You have to do this via “add WIFI network” and make sure you add the correct name, there isn’t a password requirement on the connection. Once it is connected once you do not need to reconnect, it will automatically connect when the fish spy is on.
Turning the fish spy on
There are 3 positions to you fish spy, these are unlocked, locked and redirecting. When unlocked you can plug the device into charge or get your footage. The top of the float will be loose when unlocked. For transporting the locked position holds everything in place and waterproof. If the battery has died you can use it as a standard market float in this setting. Then the next setting is for recording, turn it to this and the recording will start. Connect your phone to the fish spy WIFI and open the app. Cast it out and off you go!
Fish Spy Tips
Here are my top tips for getting the most from your fish spy!
1 – Take your time!
As with all new devices, it takes some time to get the best footage from it. Don’t expect to attach it and then launch it as far as you can and get amazing footage. Due to its weight, it flies differently than a streamlined marker float and can be more affected by wind. I would advise taking it to clear water and having a practice with it before you start using it fully.
2 – Let it go down to the bottom
From my experience, unless the water is phenomenally clear or shallow, you don’t get a great stream from the surface. It is better used to target clear spots and then pull the spy down in the water and watch the footage back when it’s on the bank. This will give you a much better view of your clear spot and makes much better use of the device. you can then watch the data back on the app once you have retrieved the spy. NOTE – You need to turn on record on the app or you’ll only get the live footage.
3 – Consider buying something else!
In my opinion, this isn’t the best gadget on the market, but at its current pricing, it’s decent tool for the money.
If you have a large budget consider the newer version that combines the Fish Spy camera with a sonar feature finder. I’ve not had a chance to have a look at one of these yet and with the limitations of the Fish Spy above the water, I’m not sure that I will as I already have a Deeper Pro Chirp.
4 – Use it at the end of your session as well as the start
If you are using it to find spots and features and recording what the bottom looks like then use it at the end of the session. Send it back down to record what the bottom looks like now – how much of your bait is left? Is there anything specific that the carp have eaten or left that you can learn from. This will help you to identify how good the spots you are fishing over and working on your baiting patterns and mixes for your next session.
Fish Spy Review
This review is based on my personal opinions on the Fish Spy. I bought the Fish Spy myself and have not been paid, or been in contact with Fish Spy about this.
In my opinion, the Fish Spy is one of those things that sounds like a good idea but in practice isn’t a major advantage if you do not use it correctly. If you are already handy with a marker float and feeling the bottom then I would possibly stick to that. Whilst it is handy to look at what you are fishing over and this is the best option for the price.
I have a Water wolf HD camera (see review here) which I much prefer. It has a range of other recording options including looking at your rigs and I use these all the time in the winter when the water is clearer. If I want to see the bottom on a spot I can clip up and cast it to my spot and then just take the memory card out and look at it on my phone. I appreciate you can get the images off the fish spy on to your phone from the app, for me it is just that the Water Wolf is more versatile.
In some cases, I did find the Fish Spy struggle with the range and was a pain to reconnect when it had been underwater at distance. On some occasions, I had to reel in to reconnect it and then cast it back out. I do think the sonar and camera version will not have as many issues as it sits on the surface more like the deeper rather than going underwater as much. Although, this could again lead to issues if the water is not perfectly clear.
Overall I would give it 6 out of 10! For the £60 price tag it now has it’s okay, but the price it was first retailing at no chance!


